Let’s be honest. Cloud architecture promises infinite scalability, but sometimes it feels like we’re herding cats wearing rocket boots. I learned this the hard way when my shiny serverless app, built with all the modern best practices, started hiccuping like a soda-drunk kangaroo during a Black Friday sale. The culprit? AWS API Gateway throttling under bursty traffic. And no, it wasn’t my coffee intake causing the chaos.
The token bucket, a simple idea with a sneaky side
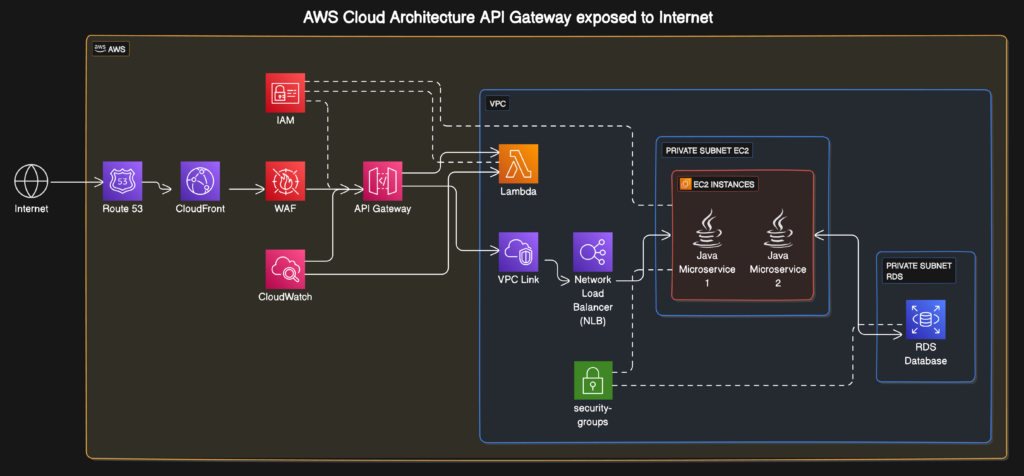
AWS API Gateway uses a token bucket algorithm to manage traffic. Picture a literal bucket. Tokens drip into it at a steady rate, your rate limit. Each incoming request steals a token to pass through. If the bucket is empty? Requests get throttled. Simple, right? Like a bouncer checking IDs at a club.
But here’s the twist: This bouncer has a strict hourly wage. If 100 requests arrive in one second, they’ll drain the bucket faster than a toddler empties a juice box. Then, even if traffic calms down, the bucket refills slowly. Your API is stuck in timeout purgatory while tokens trickle back. AWS documents this, but it’s easy to miss until your users start tweeting about your “haunted API.”
Bursty traffic is life’s unpredictable roommate
Bursty traffic isn’t a bug; it’s a feature of modern apps. Think flash sales, mobile app push notifications, or that viral TikTok dance challenge your marketing team insisted would go viral (bless their optimism). Traffic doesn’t flow like a zen garden stream. It arrives in tsunami waves.
I once watched a client’s analytics dashboard spike at 3 AM. Turns out, their smart fridge app pinged every device simultaneously after a firmware update. The bucket emptied. Alarms screamed. My weekend imploded. Bursty traffic doesn’t care about your sleep schedule.
When bursts meet buckets, the throttling tango
Here’s where things get spicy. API Gateway’s token bucket has a burst capacity. For stage-level throttling, it’s tied to your rate limit. Set a rate of 100 requests/second? Your bucket holds 100 tokens. Send 150 requests in one burst? The first 100 sail through. The next 50 get throttled, even if the average traffic is below 100/second.
It’s like a theater with 100 seats. If 150 people rush the door at once, 50 get turned away, even if half the theater is empty later. AWS isn’t being petty. It’s protecting downstream services (like your database) from sudden stampedes. But when your app is the one getting trampled? Less poetic. More infuriating.
Does this haunt all throttling types?
Good news: This quirk primarily targets stage-level and account-level throttling. Usage Plans? They play by different rules. Their buckets refill steadily, making them more burst-friendly. But stage-level throttling? It’s the diva of the trio. Configure it carelessly, and it will sabotage your bursts like a jealous ex.
If you’ve layered all three throttling types (account, stage, usage plan), stage-level settings often dominate the drama. Check your stage settings first. Always.
Taming the beast, practical fixes that work
After several caffeine-fueled debugging sessions, I’ve learned a few tricks to keep buckets full and bursts happy. None requires sacrificing a rubber chicken to the cloud gods.
1. Resize your bucket
Stage-level throttling lets you set a burst limit alongside your rate limit. Double it. Triple it. AWS allows bursts up to 5,000 requests for some tiers. Calculate your peak bursts (use CloudWatch metrics!), then set burst capacity 20% higher. Safety margins are boring until they save your launch day.
2. Queue the chaos
Offload bursts to SQS or Kinesis. Front your API with a lightweight service that accepts requests instantly, dumps them into a queue, and processes them at a civilized pace. Users get a “we got this” response. Your bucket stays calm. Everyone wins. Except the throttling gremlins.
3. Smarter clients are your friends
Teach client apps to retry intelligently. Exponential backoff with jitter isn’t just jargon, it’s the art of politely asking “Can I try again later?” instead of spamming “HELLO?!” every millisecond. AWS SDKs bake this in. Use it.
4. Distribute the pain
Got multiple stages or APIs? Spread bursts across them. A load balancer or Route 53 weighted routing can turn one screaming bucket into several murmuring ones. It’s like splitting a rowdy party into smaller rooms.
5. Monitor like a paranoid squirrel
CloudWatch alarms for 429 Too Many Requests are non-negotiable. Track ThrottledRequests and Count metrics per stage. Set alerts at 70% of your burst limit. Because knowing your bucket is half-empty is far better than discovering it via customer complaints.
The quiet triumph of preparedness
Cloud architecture is less about avoiding fires and more about not using gasoline as hand sanitizer. Bursty traffic will happen. Token buckets will empty. But with thoughtful configuration, you can transform throttling from a silent assassin into a predictable gatekeeper.
AWS gives you the tools. It’s up to us to wield them without setting the data center curtains ablaze. Start small. Test bursts in staging. And maybe keep that emergency coffee stash stocked. Just in case.
Your APIs deserve grace under pressure. Now go forth and throttle wisely. Or better yet, throttle less.